Thursday, July 1, 2010

The walk down the aisle

Well it's been a long time, but here, finally is the long awaited post concerning my walk down the aisle.

The course of true love never ran smooth and neither did my trip down the aisle - which was actually the ramp down to the pier where Justin & I were married. The wood ramp down the pier. The outdoor wooden ramp, by a large body of water. So, to be perfectly clear, the surface was very uneven. Basically designed to catch on knitted lace. Due to various issues during train construction and bustling concerns and the whole "cutting off of the bottom 12" of the dress" the knitted train was longer than the fabric train. This actually looked kind of pretty, but meant that the fabric train wasn't giving the knitted train the protection that I'd thought it would.

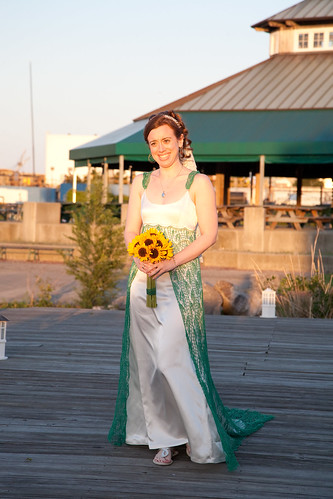
Just before I set off down the aisle, there is an indication that we might have a tiny little problem:

IMG_0193

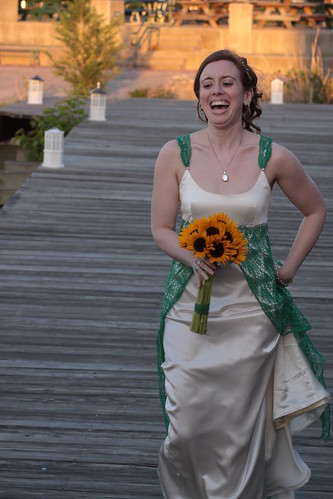
Undeterred, I started my walk down the aisle:


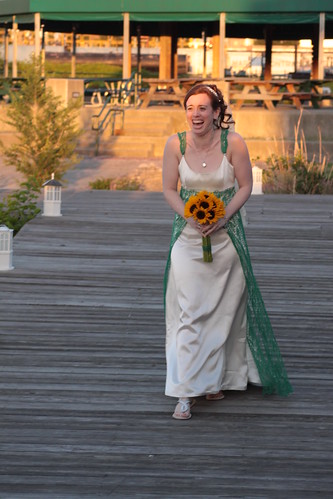
See how pretty and spread out the train is? I think was actually snagged again, but it looks good.

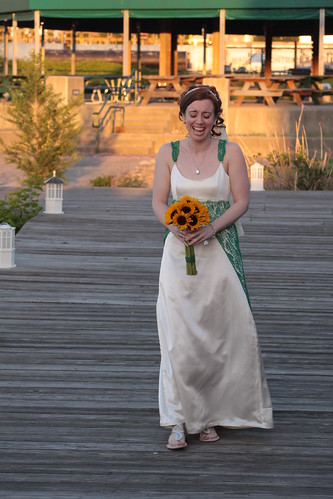
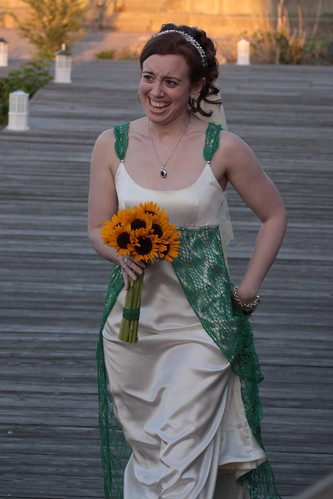
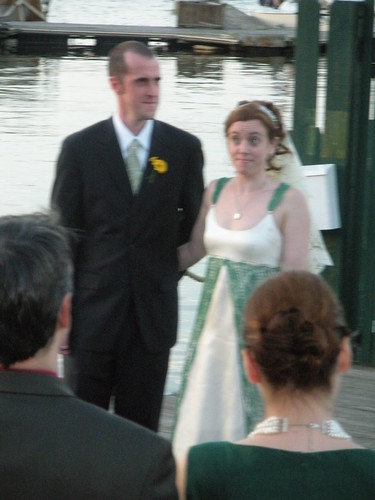
Here I am, getting my first sight of Justin.

IMG_0195

And trying not to cry.

Thos first three pics were taken by our professional photographer.

All the rest of these were taken by our friend Jay. I'm not sure if our photographer is just a little less free with his shutter finger or if he thought I might not want my herky-jerky progress captured for posterity. But Jay, with the instincts of a true friend, knew that we'd want every minute. Theresa, his wife, also with true friend instincts, immediately posted all of these pictures on Facebook.

So here it goes:

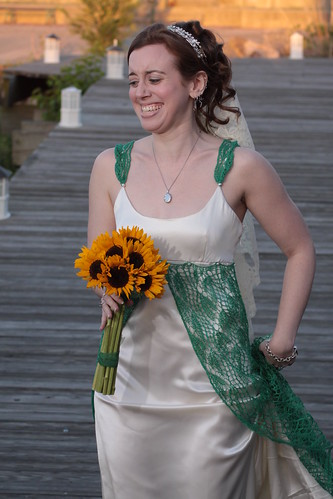
Initially I’m amused. I’m also nervous as hell so everything is hilarious.


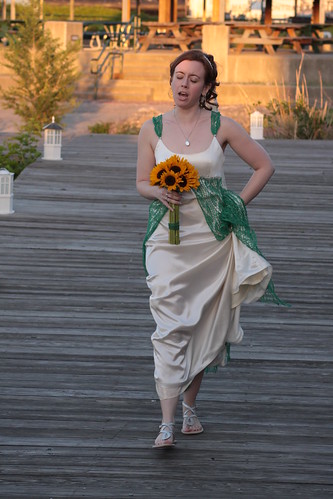
This is about the third snag, so I’m done with it. My Lady Minions are poised to spring into action, but I can’t see walking down with a train carrier.


I reach back...


And take matters into my own hands.


This photo shows me talking to myself.


I don't remember exactly, but it was something to the effect that all those people who said I shouldn't try this whole "knit your own dress" thing would probably be pretty amused right now.


Fortunately I was also amused and so were all my guests and my future husband.


And I made it down the aisle unscathed.


Of course at the end of the ceremony this happened:

IMG_0291

Leading to these reactions from the family

IMG_0292

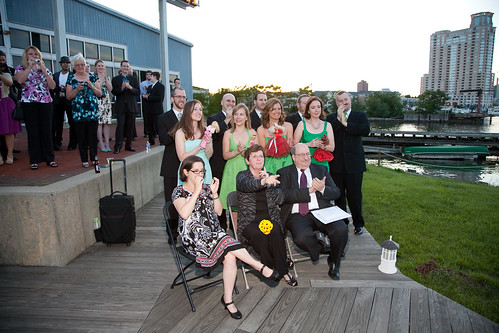
And from the Minions

IMG_0294
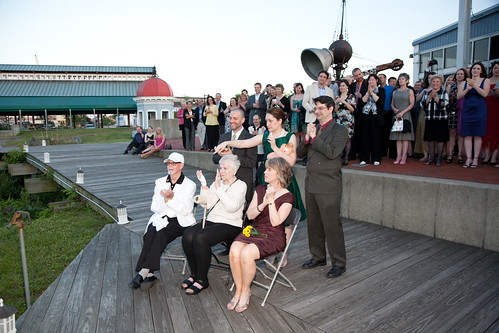
(Theresa isn't even in this photo, having lept down onto the grass to run over and unstick me. Justin & I had no idea. We were all just wed and happy.)


There was this reaction from me:

Amy Wedding_107

And this from Justin:

IMG_0296

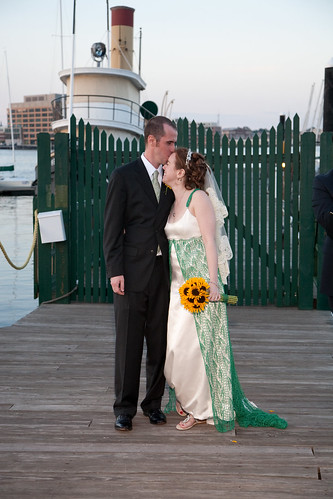
So you can see that it all worked out just fine.

Thursday, May 27, 2010

Well - we be wed

Some day I will write an epic blog entry regarding the final details. Hell, my trip down the aisle warrants a photo essay all its own

But for those who weren't there, or just didn't look at me all day, here's me in the dress before the wedding (with the ever vigilant Jenny Gill lurking behind me).


And here I am with my buddy. This was actually taken by Jenny, who was following around after the professional photographer, wrangling my train and snapping a few pics over his shoulder.


Married life is good.

Monday, May 3, 2010

Other projects - wedding related & not

I finished the shrug I was making for Mom - all part of our "If we prepare for cold weather it will be warm" strategy for weather management. I quite like it! I used Vanna's Glamour (yes, like Vanna White. She's a big crocheter. Who knew?), which is a yarn that should look cheap and tacky, but doesn't. It has a metallic strip going through it which gives it a little bit of shine, but the fabric is still soft and has a nice drape. Mom picked out the pattern - Stefanie Japel's Textured Circle Shrug

and I modified it to remove the textured stripes and made the sleeves a bit longer so they hit mid forearm instead of right at the elbow.


Should the weather be chilly, Mom will look fabulous.

I also continued work on a baby blanket I'm crocheting for a coworker. Such was my state of mind that instead of making a granny square, I somehow managed to make a granny triangle. What is really impressive about this is that I did NOT NOTICE that it was a triangle until I'd finished edging the entire thing and then went "Hey, something's wrong here!" Sheesh. Wedding brain.


Have made one strap for the dress and am part way through the second. They aren't blocked, so no picks yet.

And I started on a crocheted halter top for the honeymoon. I may or may not finish it in time, but I have to do something to keep my hands busy. My usual nervous energy is multiplied by 10x.

Wednesday, April 28, 2010

PS

I am definitely ditching the sleeves. I don't know how exactly they don't work, because they look so perfect in my head. They do not, however, look perfect on my shoulders.

I am toying with the idea of making knitted straps - similar to the straps on the original pattern that inspired me.


I like the idea of having the little extra touch of green, not just the green in the skirt.

Or I may just leave the straps plain white.

Another gown close up


The lace buttoned on to the dress. It actually pulls more taunt when the dress is on my body - this is just it draped on the sewing table.

Last night did a few hand sewn tweaks (those two problem areas which I thought I'd fixed weren't quite as fixed as I thought) and then did the actual dress hem with the horsehair. Took forever and I complained mightily to Justin about how much I hate hems and how dresses with trains have extra long hems which is unfair. I actually took the time to handsew the train in a blind stitch. Justin doesn't realize what a testament this is to my love of him, but other sewers will. I hate to hand stitch hems even more than I hate hems in general. But it looks damn good.

Then I turned up the hem on the lining - I decided not to have the lining go under the drape of the train, but just to have it follow the line of the train down the back of the dress and then stop at floor level. When the train is flipped up, a little bit of the lining will show in the back, as opposed to a tantalizing view of the backs of my ankles. The lining fabric is a darker ivory than the actual dress fabric, but I figure anyone looking close enough to notice is probably a pervert with an unnatural interest in ankles, so I'm not going to worry too much about offending their sensibilities in terms of my ivories matching.

Anyway, I turned up the hem on the lining. Since, as I just mentioned, it will show a tiny bit in the back, I wanted to make sure that I turned the hem in the correct direction, so the seam allowance of the hem didn't show when the train was bustled. I thought really, really hard about which way I needed to turn the hem, how I needed to situate the dress on the ironing board to make sure I turned it properly, etc. Then, with the unfailing instinct that leads me to get on I-95 going the wrong direction after getting off at a rest stop, I turned it the wrong way. Really, I will get off at the Chesapeake House, go to get back on 95, think really hard about which way I need to go and then get on 95 North, even though I'm driving from NYC to Baltimore. I have a horrible sense of direction. This is one reason I like the rest stops on the Jersey Turnpike - you only have one choice about getting back on the highway, so the worst you're going to do is end up in the Cars/Trucks/Buses lane when you meant to get in the one for just Cars. On the other hand, they don't let you pump your own gas, so I still prefer the Maryland rest stops. I only get back on 95 going the wrong way once out of every five or so trips.

So tonight I'll be redoing that hem and pressing it the other way. Fortunately I didn't have the energy to sew it last night, so I don't have to pick the sewing out. If that was the case, the ankle perverts would probably be looking at the seam allowance, as well as being shocked by the non-matching ivories.

Friday, April 23, 2010

Sewing Tweaks are done!

After completion of the major sewing last Thursday (April 15th. on schedule, if you recall), there was some tweaking that needed to be done. There were two spots on the bodice that weren't laying quite right - one on the left side of the scooped neck and one under the right arm. In heavier fabric it probably wouldn't have been noticeable, but the silk is so delicate that every little pucker is obvious. I also realized that the left strap really needed to be half an inch shorter and that I might have sewn the lining down a little too tight, which was contributing to these pucker issues.

I spent one night thinking about these problems and finishing up the knitting. Then I pulled out my lovely handsewing around the lining and made my modifications. I carefully basted and tried the dress on and checked after every single change. I spent a lot of time sitting at the machine in my underwear and the dress's zipper got a workout (on the plus side, it no longer sticks at all!) In the end, all the changes made it just right. I had started to wonder if I was going to have to redo the whole bodice b/c I'd determined that I could not live with these little imperfections and I was more than a little nervous that I wouldn't get rid of them any other way. Fortunately this was not necessary!

Then I spent a night sewing on the buttons around the bottom of the bodice - this is where the lace will attach.

Put another button at the top of the train seams for the train to hook onto (exact details of that still fuzzy).


Last night finished resewing down the lining. And my shoes arrived. We have a weekend of more wedding festivities ahead of us, but after that - hem! I've decided not to block the knitting until I'm down in Maryland since it will just need to be redone then anyway. So after the hem, it'll be done.

I'm really not sure what I'm going to do with my free time. I contemplated doing a knitting project just for fun with no deadline the other night. I got confused and had to start thinking about something else.

I'll try to put up some more pics, but I don't want to show any of the completed dress til after the wedding. You know, so it's a surprise.

Wednesday, April 21, 2010

April 20th

On this day knitting was officially finished. Measured length, decreased and cast off again. Did a chain stitch crocheted border around the bottom, since instead of now having a nice cast on edge, I now had a bunch of loose stitches on a lifeline. The crocheting let me do extra chain stitches between yarnovers and keep the more closely knit parts close, so overall I think it maintains the beauty of the design and also stabilizes it.

Plus, since I decreased out those extra two repeats of the chart, the top now fits around my rib cage almost perfectly, rather than being too big.

Oh and I don't think I like the look of the sleeves. I may go without. Maybe God was trying to tell me something when that first sleeve went down the drain?

Slicing the skirt

A photo essay.


The damaged Size 13 border:

The non-damaged Size 10 main body:

The Lifeline between them:

The first cut:

After that I rapidly got impatient with unraveling and switched to my big scissors:


This turned out to be a mistake in terms of time spent. I got the bottom hacked off quickly and had no chance to lose my nerve. But it took FOREVER to unravel backwards up to the lifeline. It also took awhile to unravel and reclaim the yarn of the original border and I lost a lot of yarn in short pieces, etc. Since I hate to waste, this was upsetting to me. Plus it probably took 4-6 hours to do all that.

So in terms of "crappiest moments working on the dress" this was a close second to the whole dyeing "oh my god it's blue" day.

Fortunately it looks good now.

Tuesday, April 20, 2010

April 15th

Keeping you in suspense a bit regarding the great cutting of the knitting. I took some pics, etc, but they're still in the camera, so instead you're getting a post about the finishing of the sewing.

I had set the personal goal that all major sewing be done by April 15th, one month before the wedding. It was also convenient b/c April 15th was a Thursday, right before Justin & I were heading down to Baltimore for more wedding related festivities.

People at my job having been giving me crap about not being a nervous bride, being generally work focused, etc. So I decided to take advantage of their generosity and understanding and give them some neurotic bride behavior and leave work early to finish up the dress. And it worked!

The dress was already in good shape, the main thing that was missing was the train. I was able to draft out the train piece in the silk and sew it in, as well as pulling and resewing (correctly) the train lining, which I had previously just basted in to make sure it looked okay. I noticed that the left bust dart in the lining wasn't sewn properly and was causing some of the lingering fit issues I'd noticed, so I fixed that too. Then did all the hand sewing - sewing down the bodice lining over the bodice/skirt seam, sewing the skirt lining onto the back of the zipper so the inside was cleaner, etc.

I also bought some horsehair braid to stiffen the hem and bought enough pearl buttons to attach the lace and to bustle the train.

All that needs to be done now is to sew on those buttons (can't be done till the lace is 100% done. Again.) and to sew up the hem (can't be done until I have my shoes).

And I bought my shoes yesterday online! They should arrive on Thursday, so I'd say it's 50/50 that the dress might be DONE by the end of this week.

Wouldn't that be weird?

Tuesday, April 13, 2010

Knitting Redux

So I've alluded to the fact that there are some problems with the bottom of the knitted lace - specifically the part knitted on the Size 13 needles. Heck, I might have gone on at great length, I'm too lazy to go back and reread old blog entries.

This past Saturday Justin had his bachelor party and our apartment was filled with many, many men drinking a lot of whiskey and watching old WWF videos. I took this opportunity to flee to the East Side and spend the night at the apartment of my good friend & minion Jenny Gill, whom this blog knows well. I took the dress with me, figuring it could use some air, since it hasn't left the apartment since it came home as a cone of yarn many, many months ago. I took the dress out of its bag and told Jenny (probably for the 5th time) of the problem with the bottom border and how I was becoming more and more convinced that I was going to have to cut it off. She was skeptical, but once she saw the dress she agreed. The majority of it looks fabulous, the pattern is crisp and generally lovely. The bottom just looks kind of bedraggled and somewhat like it had been mauled repeatedly by Chiana. (Which it has not. She has generally been very well behaved to the dress.) Even when I was knitting it, I knew this part of the dress was very delicate and I talked about the almost frothy quality that it had, something which I, quite frankly, loved. I knew it was delicate, but I had faith in my ability to avoid protruding objects on the wedding day and generally prevent disaster.

Unfortunately dyeing was the downfall of the dress border. If I'd had correctly colored yarn from the start and only ever had to steam block it, I think the border would have made it. But I think any full scale immersion in water would have done it in. The repeated dunkings and agitations that dyeing the dress not once, but twice required, were just too much for the border. The yarnover holes became HUGE and the more tightly knitted "leaves" of the pattern became tiny. The crocheted border now just looked like crap. I would try to describe it some other way, but frankly, words fail me.

So I resolved to unpick the top part where I had bound off and starting knitting again, with size 8 needles. After about 5 minutes of picking at the final knot, I got it free and pulled back the last 3 rows, which included two decrease rows and a row of plain knitting I'd added for stability. The lifelines I'd chosen to leave in - 3 of my original 6-7 turned out to be really, really well chosen on my part. There was one just below those final three rows - made unraveling them and picking up the stitches a snap. There was another where I switched over from the Size 10 to the Size 8 needles. Okay, this one really has served no purpose in terms of knitting, but it's nice b/c it's also where the train ends, so it provides an easy reference point in terms of that. The final one is where I switched over from the Size 13 to the Size 10 needles. When I finish this blog entry, I'm going to go and cut the yarn below this lifeline. I'll then pick up the stitches and do... something. Maybe a crocheted bind off. Maybe something else.

I made this decision Saturday night and now it's Tuesday. I have made some excuses as to why I've put off this cut for 3 days. Some were legitimate - I drank a lot of wine on Saturday night and didn't want to do anything stupid. I also wanted time to do some new knitting at the top and make sure it still looked good. The overall design of the knitted lace piece won't really be changing, but the train will be dropping down to start at my lower back as opposed to my mid/upper back and the train itself will be becoming slightly smaller. I wanted to make sure this looked okay. It does. And I think a smaller train will if anything, be more appropriate to our casual wedding. Plus I still have no clue how to bustle the damn thing.

But it also took me a few days to get used to the idea, at least in my subconscious. Thinking about it consciously for as long as it's taken me to write this blog, I'm starting to get a little nervous. So I'm going to stop typing (ie. procrastinating) and go take the plunge.

The dress will be better for it.


PS I bought some buttons today. If they work with the dress I'll buy some more soon.

PPS The fabric part of the dress is going very well and once I work out some train issues, it'll be just about done. I should still be able to meet, or come very close to my goal of having it done before Justin & I leave town this weekend.

Monday, April 12, 2010

Invisible Zipper Feet are made by the Devil

I am not a terribly intuitive person when it comes to mechanical things. I will be the first to say that I am good at many things, but putting things together, spacial relations, that sort of thing, I am not good at. (I also have a horrible sense of direction, but that's neither here nor there.)

So when the time came to attach the special invisible zipper foot to my sewing machine, I had a few difficulties. I have set many zippers in my time, and as I said in the last post, I'm pretty good at it. This was my first invisible zipper.

My first problem came when I took the zipper out of its packaging and saw this instruction:


Of course, I had already sewn the seam. I decided to wing it rather than picking it out. I ironed the zipper flat as instructed.


Then I took the invisible zipper foot out of its packaging and attempted to assemble it. There were various attachments depending on the "shank" of your sewing machine. Let me make it perfectly clear, I have no clue about anything regarding my machine's shank. Fortunately the packaging offered suggestions based on the machine's manufacturer. Unfortunately my machine's manufacturer had two different option attachments. Neither of them made any sense to me.

I then consulted the internet. Found several blogs/FAQs/etc on invisible zipper installation, of which one was actually vaguely helpful. Spent 15-20 minutes alternately staring at the machine and then running into the living room to stare at the pictures on the computer. This became very frustrating. Finally realized that the invisible zipper presser foot did not snap on/off like regular presser feet. Rather, I had to unscrew and replace the entire presser foot apparatus. If you have a sewing machine, this might make sense. If you don't, don't worry about it, just trust me that it is really unintuitive and would have been MUCH easier if someone had, I don't know, SPELLED THAT OUT IN THE DIRECTIONS.

Did I mention all this was on Thursday night? Can you tell that I'm still annoyed about it?

Anyway, here, finally is the installed presser foot.


Once I had that taken care of, getting the zipper in was pretty simple. Here it is half done:


I could see where the installation would have been much simpler if I hadn't already sewn the seam. In fact, when I got the zipper in, the seam ended up being crooked, so I had to rip it out anyway. Oh well.

Also I have some basting pinhole issues that I have to deal with or I'm going to have to remove and resew the skirt. Oh and the darts are showing through on the bodice just the tiniest bit, but it's bugging me, so I'm going to trim off the excess fabric there.

Still, definite progress made. I'm cautiously optimistic that I might be able to finish by this weekend. Very cautiously.

Thursday, April 8, 2010

Much Accomplished!

Looking back at blog titles, I seem to have two modes - super productive or nothing is getting done. Oh well, I guess I've always known that I wasn't a moderate person!

Monday - bought a new iron, sewed up the skirt seams. Discovered that although the new iron's directions specifically say not to use steam on silk, the wrinkles only disappear if I do. Basted the skirt onto the bodice and realized that I really needed to purchase a bra to wear with this thing.

Tuesday - bought not one, but two bras. Took them home and one is perfect. Bodice was making kind of a weird dent above where the bra ended. I think it needs some interfacing to give the layers of silk some more support. Also thought it could be lower cut. Tried on the dress with the knitting over it. Pretty! But the bottom of the knitted skirt is still kind of a mess. Tried some intensive steam blocking, but I just can't get that lower portion (what was knitted on the Size 13 needles) to perk up.

Wednesday - ripped apart the bodice, added interfacing to the lining. Resewed the lining to the bodice top. This took many tries and many careful seam rippings. Finally got a nice, symmetrical curve, lower cut but not too low cut. Also took some tweaking to get the straps positioned just right.

Plan for tonight - actually sew the skirt to the top; press the top and finish trimming those seams. Set in the zipper. I'm a little nervous about this as I've never done an invisible zipper before. On the other hand, I'm usually pretty good with zippers, so fingers crossed. I must remember to BASTE it first. I'm just going to keep repeating "baste" to myself at random intervals today.

Still thinking about what to do with the knitted skirt bottom. I can't leave it all on there and I can't take it off either - the dress will be too short. Do I take off some? Do I take it all off and knit some additional lace at the top to make it longer? The whole skirt will have a narrower silhouette then, but it's crazy wide already, so I'm not concerned about that. What to do, what to do...

Monday, April 5, 2010

If it's not one thing, it's another...

Massive amounts of cleaning & organizing around the house this weekend, and some sewing. I finished sewing the seams on the lining, cut down the actual skirt pieces to the width I wanted at the top where they will be attached to the bodice and sewed part of one skirt seam. Then, as I was pressing the lining, the iron started to spit water all over my fabric. I thought this was because the water was running low in the steam chamber, so I refilled it, let it heat up and tried again. More spitting. Really, spitting is kind of an understatement, as it implies that a little water came out. This was enough water to make 4" x 10" splotches on the lining. As in, something I really would NOT want to have happen on the actual SILK dress fabric.

I can only thank the sewing gods for smiling on me. That and go buy a new iron.

Oh, and under the heading of "I can't possibly be making enough projects for this wedding" I'm making a shrug for Mom (cross reference this under, "We are making warm wraps so it will be 95 degrees on the day of the wedding"). I'm using this pattern, only not doing the knit/purl strips (mainly visible on the sleeves in the pattern pic). I'm making the sleeves slightly longer than the pattern calls for and ending each of them with 10 rows of seed stitch to prevent rolling. So far I have the back, all of one sleeve and most of the other. Of course, I still have to pick up all the stitches for and knit the border which forms the collar, rest of the back and the sides. But so far, so good.

Wednesday, March 31, 2010

A busy weekend that did not involve sewing

We met with the caterer.

We got our marriage license.

I had a wedding shower in Baltimore.


(To see more shower pics click here.)

We went to a friend's wedding and I wore the shrug (and received compliments!)


And now A Voluminous Evening of Brevity is playing to sell out crowds! We were even offered an extension, which we unfortunately had to turn down due to actor availability and the importance of protecting the integrity of the show.

But after that closes tonight and I sleep for about 24 hours, I'm heading back to the sewing machine.

Tuesday, March 23, 2010

Shrug Done/Sewing Commences

Unfortunately gloomy weather yesterday & today means I've taken no photos as yet, but I can report that Sunday 3/21 saw the beginning of official sewing on THE DRESS as well as the completion of the wedding day shrug.

The shrug is quite lovely - a little tight, but I think it will relax with blocking. Grafting the two ends together was more complicated than I'd expected and took nearly two hours. Least said about that the best. I may wear it to a friend's wedding this weekend as I'd like to get more than 1 day's wear out of it and wearing it on our wedding day isn't even guaranteed.

By the way, I don't think it's too early to start praying for beautiful 75 degree, sunny weather on May 15th. Not too early at all.

Sewing commenced on Sunday morning. I had cut yet another bodice piece out of lining fabric and used this to figure out the issues with the bodice. I'd had some problems with the darts on this pattern - they just weren't laying properly. The ends were poking out in a way that looked dumb at best and kinda like Madonna in the early 90's at worst. Finally realized that the main problem was that, measurements given on the pattern envelope not withstanding, I really should have cut a smaller size for the bodice. Fortunately I was able to partially recut the pieces and adjust the side seams and got a nice smooth fit. Was able to translate those changes to the actual bodice pieces (bodice, underlining, lining, all cut from silk) and completed the bodice, along with sleeves. Also made some modifications to the skirt pieces, again starting with the skirt lining, to make the skirt completely A line as opposed to partial A line, partially gathered at the waist.

I'd love it if I could attach the skirt pieces to the bodice before we leave for Maryland this weekend (that would still leave the train, setting in the zipper and the hemming). But between performances of A Voluminous Evening of Brevity tonight and tomorrow and the bus at 9pm on Thursday, I think it's unlikely. Still - you never know!

PS I knitted one new sleeve on Oscar night. Somehow I never posted that. Am planning to knit the other on the bus on Thursday. This weekend told Justin the story of the sleeve that went down the drain. He was surprisingly calm about the whole thing, although the fact that it happened weeks ago and our drain has been fine since probably contributed to that calm. That and several Heinekens.

Wednesday, March 17, 2010

Fabric Shopping - Done!


Went out yesterday at lunch and GOT IT DONE. Phew! Major load off my mind.

Got a good deal with a smaller fabric store in the garment district - they knocked off a dollar a yard when I said I needed 5 yards and then threw in the half yard at the end of the bolt, presumably b/c I am so darn cute. It took a little while to find just what I wanted - I had a swatch from the store from last fall, but at first they were giving me a lighter, more yellow ivory fabric. Eventually, after drafting in one of his coworkers to assist, the fabric store employee and I were able to find something that was just right.

Laid it out and cut out everything but the train last night. Have about 2-2.5 yards leftover, which is what I was hoping for. Enough for the train and to recut some bodice pieces if need be. I went ahead and cut the skirt pieces off of the New Look pattern I used for the second trial dress - the skirt was still fuller at the waist than I wanted, but it's always easier to take something in rather than let it out.

Unfortunately I have no soundtrack for the cutting - if I did it would feature frequent scratchings and mewings by Nyssa. I finally had the brilliant idea to lay out the dress in the bedroom where I could shut the doors and keep out the cats, as opposed to in the living room, where it's a kitty free for all. Needless to say, Nyssa was not pleased to be excluded.

Friday, March 12, 2010

Stalled

A stomach flu pretty much derailed me for this week, so no progress. Fabric shopping postponed til next week, but I need to GET THIS DONE.

Monday, March 8, 2010

Preliminary Fabric Shopping

Well the final test run of the dress didn't go so well - I didn't like how the pattern piece I'd drafted for the top turned out and I still find the skirt to be too full.

But Mom and I did do some fabric scouting at Mood Fabrics on Friday and I think I've settled on the right material at least! It's a lovely ivory silk, fairly lightweight with a nice sheen. We found it at Mood Fabrics and I also have a similar swatch from a smaller fabric store I visited last fall. So sometime this week I'll be purchasing that.

As for the still undetermined shape of the bodice, skirt and train, I'm just going to wing it. Generally I do best that way. Although looking at the list of dress parts which I'll need to wing it on, I realize that it's basically the whole dress.

Oh well - onwards and upwards!

Wednesday, March 3, 2010

The shawl


Has been taking up a lot of time. Here it is.


I still really need to make new sleeves to replace the one that went down the drain and the other one which was a victim of the dye.

Monday, February 22, 2010

Fixing a Hole

Warning: this post is not for the faint of heart!

Two things before you start:
1) This post contains a mystery which remains unsolved.
2) It has a happy ending.

So, I mentioned in another post that there was a hole.

This is it.


Yeah, it's not pleasant. Of course, when you look at it in context, it becomes a little less scary.Can you see it? I circled it below.


So, not a tiny hole and certainly not one that could be ignored. But it could have been worse. The weird thing about this hole, which I noticed almost immediate, was that there were no broken threads. I couldn't find the spot where the yarn had broken to allow this bit of unraveling to occur. For those of you who are not knitters, each knitted stitch is looped through the one below it. And is connected to the stitches on either side of it. If you drop a stitch at the top of a knitted piece, it's possible for that loop to unravel all the way down to the bottom cast on edge (similar to when you get a run in your pantyhose - starts as a little hole/broken thread and away it runs). But if you don't drop a stitch, and the yarn doesn't break, there's really no way for the loops to unravel. Even if this made no sense to you, trust me, there's no way for a hole to develop without a broken bit of yarn or a dropped stitch.

If some more experienced knitter out there does know how this could happen, please tell me. Because I cannot wrap my head around it. As you may have guessed, this is the mystery of the post.

I looked for the broken yarn, but couldn't find it and figured I would go about fixing the hole and the broken ends would present themselves. Fortunately for my current purposes, the lace is now very stiff, so the stitches were very easy to pick up. The hole occurred in the part that was knitted on size 10 needles, but I used a much smaller needle, a size 2 to pick up the stitches.

Here are the stitches picked up. You can see that I used a pair of needle nosed tweezers to pick up some of the loops. It worked so well that I can't believe I'd never though to use tweezers before. Even better than using a crochet hook!


You can see how the lifeline is right below the area where the hole formed. Sheesh! But back to the problem at hand. I figured out which part of the pattern had unraveled. Then separated the strands and started reknitting them. After knitting them on the size 2 needles, I transferred them over to a size 10 needle so that the stitch size was consistent. Here's the size 10 needle.
Here are both the size 10 and size 2 needles.
I kept knitting. I found no loose or broken threads. I completed the pattern and ended up just having to tie the bit I'd reknitted onto the existing stitches on the side. I used some of the left over yarn I'd dyed and tied it very tightly and wove in the ends.

If you look at the pic below you can see that although the worst of the hole has been corrected, there is a wide section right in the middle of that looks like a stocking run. There should be a line of stitches and yarn overs up through there. Somehow they'd vanished too.


I reknitted those stitches as well and then tied them in where they were supposed to be. Again my tweezers were quite helpful.
And that's how I fixed the hole in the dress. It looks pretty good if I do say so myself.

I still have no idea how the hole was created. I hope no other holes spontaneously appear. This was almost fun to fix, like doing a jigsaw puzzle and a logic problem at the same time. But it also took about two hours, during which time I was in the guest room with the door shut and Nyssa constantly beating on the door. (For those who don't know, she is a very large cat.) I would prefer not to do this again.

Friday, February 19, 2010

PS

Oh, remember the sleeve that went down the drain? And how it was draining normally?

Well Tuesday morning when I was taking my shower for work, I noticed that the tub was filling with water. Our drain is a little slow sometimes, so I didn't think too much of it until it was up to my ankles.

Some might call this denial.

By the time I recognized the problem, I had to seriously speed up my shower to keep water from overflowing onto the bathroom floor.

Fortunately some strenuous plunging dealt with the problem.

It's been fine since then.

I still haven't mentioned the whole sleeve/drain thing to Justin.

We'll see if he's reading the blog.

Thursday, February 18, 2010

Dyeing Saga continues

So I patiently waited my two days, which was really only one free evening of crafting time. I did some sewing and started knitting on my wedding shawl.

(Oh, did I not mention I'd decided to do a shawl too? My mom convinced me that it could be quite cold on May 15th, as it was in 2009 and I'd want to be able to go outside and still look pretty. So I started working on this in cream. In my defense, I conceived of this idea before I realized that there were going to be dyeing complications.)

Wednesday when I got home from work there was no change in the wrongness of the fabric color. Here it is with one of the swatches and a tiny ball of yarn dyed in the correct color. You can see at the top left of the picture that I'd dyed tons of extra yarn as well.

My plan was this - take some of the extra yarn and dye it in the yellow Rit dye. Take the sleeve which had gone through the dye remover (I never took a pic of that, but it came out baby blue) and dye it in the same green dye combo which had produced the swatches above. Of course it also produced the dress, so that was a bit risky. I also did some more reading and figured that at some point I'd upped the amount of dye I was using more than necessary, so I decreased that as well.

I mixed up the big vat of Rit dye, using a cup of salt as they'd recommended when dyeing linen. (I'd also bought more salt.) And I did a little sample size of the green dye. (not pictured)

Well after about 15 minutes I thought that the sample in the yellow looked great. I waited 30 minutes as instructed. Still good. I rinsed. Still good. I washed in Synthrapol - still good!

At this point the green sleeve had been in soda ash for about 15 minutes but I could tell that it looked waaaay too dark. I decided to throw caution to the winds and dye the whole dress (except for the two sleeves, since one was down the drain and one was in the other dye bucket).

So I did. Part way through I was concerned that the yellow was being too highly diluted - there was now a LOT more fabric in the bucket and it was still leaking green dye, despite being washed and rinsed several times. I diluted some dye in hot water and poured it in.

After half an hour I pulled it out. It looked great. I rinsed, washed in Synthrapol and then spent what felt like the next 3 hours washing out all the Synthrapol. I think that was my initial mistake. I didn't get out all the Synthrapol and it prevented the dye from taking properly in the first vat.

So I rinsed and rinsed and rinsed and soaked over night.

When I left for work on Thursday I left this behind me.

That's our guest room bed underneath - it's a queen sized bed. So that gives you an idea of the scope of this thing.

There are still some problems. There's a big hole in the train right above the switch from the Size 13 to the Size 10 needles. If it had been in the Size 13 part I'd have just cut the whole thing out as now that it's been fully wetted down the whole thing is about 4-6" too long. (So much for hearing that dye was going to shrink it!) But anyway, the hole is above the lifeline. After all that we've been through though, this doesn't even phase me. The size of the hole compared to the overall size of the dress is so tiny. It's kind of hard to imagine b/c it is a big whole. But I think I could gather it shut with dental floss and it would barely be noticeable in that sea of knitting. (I won't be doing that obviously).

Thursday morning Justin and I stood cramped in the guest room with Justin blocking the door so the cat couldn't enter. Nyssa feels that the guest room is her room and was quite displeased with me for kicking her out. We looked at the dress and I sighed deeply. Justin gave me a hug. Then he screamed. I looked at him.

"The cat scratched me trying to get in, " he said, "let's get the hell out of here before she does something drastic."

So we shut the door and went to work.